Wednesday, August 31, 2011

Switzer Land :: Jacob and Catherine sell to Daniel Deemer

There were certain rather interesting reservations(at least I thought so)made in the sale of this land... On February 10, 1847 Jacob Switzer and Catharine, his wife, sold their property in Salem Township to their son-in-law Daniel Deemer for the sum of $... This was the land that was situated in the South ½ of the Northeast ¼ of Section 33 in Township 15 Range 3, which was bounded by the lands of John Bricker, Samuel Wall, Abraham Arter, Simon Arter and Samuel Entrikin and contained eighty acres. Jacob had purchased this land on March 26, 1838 for $2600 from John and Hanna Froth.


The land was sold, with provisions as set forth in the second paragraph of page 777:

“Reserving nevertheless to him the said Jacob Switzer and to the said Catharine & to the survivor of them during their natural lives and the life time of the survivor of them the house in which they now reside on said premises with the appurtenances – also the truck patch which lays North West of said house containing one quarter of an acre & the orchard which lays East of said house and contains one and a fourth acre – also one half of the garden – also all of the rights and privileges set forth in an article of event date herewith entered into between the said Deemer & said Switzer which said article and all the covenants therein contained on the part of the said Deemer, are hereby expressly charged upon said real estate which is hereby conveyed subject to the same...”
And the legalese continues on page 778. In the portion just prior to the signatures is wording that I've never seen in a deed record before:

“And I the said Catharine wife of the said Jacob do hereby, in consideration of the money paid to my said husband, remise, release, and forever quit claim to the said Daniel Deemer and to his heirs and assigns, all my right and title of dower in and to the above described premises.”
The Article of Agreement between Daniel Deemer and Jacob Switzer and Catharine Switzer was made and concluded on the 10th day of February A.D. 1847 (beginning at the bottom of page 778 and continuing on to page 779).

“That whereas the said Switzer & wife have this day conveyed to the said Deemer the South half of the North East quarter of section number thirty three in township number fifteen in Range number three, in said county for the consideration of two thousand dollars & other considerations – fifteen hundred dollars of which consideration is given to the said Deemer who is the son-in-law of said Switzer & wife – And whereas the said Switzer & wife have made in said deed certain reservations – therefore , the said Deemer covenants & agrees to pay the said Jacob Switzer (as the balance of the consideration of said $..) the sum of five hundred dollars as follows – one hundred dollars on the first day of April 1847 – one hundred dollars on the first day of April 1848 - $100 on the first day of April 1849, $100 on the first day of April 1850 – and $100 on the first day of April 1851 – in accordance with five promissory notes of even date herewith.
“And it is further agreed between the parties that the said Jacob Switzer & Catharine his wife, and the survivor of them, shall reserve for their own use & for the use of the survivor of them the house on said premises in which they now live – also the privileges of the yard around the same – also the truck patch North West of said house of about one quarter of an acre – also the orchard which lays East of the said house containing about an acre and a quarter, also one half of the garden – also pasture and hay from off said premises for one horse and two cows, and stable room for one horse and two cows, also pasture and stabling for two hogs – also the said Switzer & wife or the survivor of them to have one third of the chickens, which shall grow from said premises (the said Switzer & wife to feed said one third thereof.)
The said Switzer & wife also reserve as much fire-wood as they need for their own use (they to cut & haul the same) also the said Switzer & wife to have the manure from said farm for their truck patch & garden as much as they may want for their lives or of the survivor – all of which right and privileges the said Deemer covenants to furnish & guaranty to the said Switzer and wife during their natural lives and the life of the survivor of them. And for the security of the said Switzer & wife, all the above privileges rights and covenants of the said Deemer are hereby charged upon the said premises. In testimony whereof we have hereunto set our hand and seals this day & year above written.”
The Deed was Signed by Daniel Deemer, Jacob Switzer and Catharine Switzer (with her mark).Attested by Edward Carroll and Beulah R. Wright Carroll


The legal stuff continues on page 780. However, I somehow managed to miss scanning that page while at the Family History Library earlier this year! Hopefully there is nothing of major importance included on that page!


Columbiana County, Ohio Deeds Volume 38 page 777 (FHL Film 926944)


Columbiana County, Ohio Deeds Volume 38 page 778 (FHL Film 926944)


Columbiana County, Ohio Deeds Volume 38 page 779 (FHL Film 926944)
Monday, August 29, 2011

Trolling Around in 650B

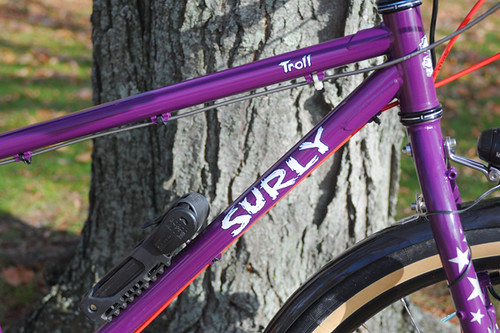
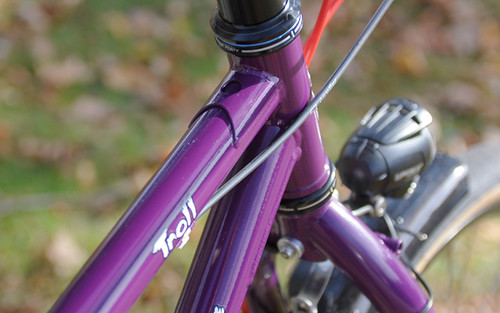
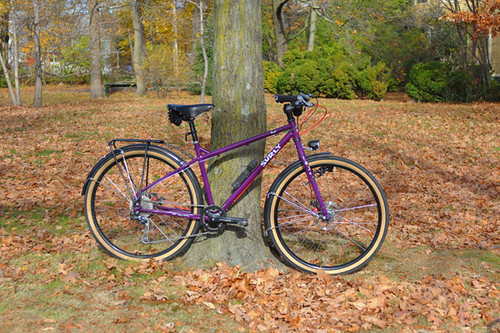
Surly Troll 650B

While Surly offers a range of practical, attractive, versatile bikes that riders everywhere love, none of them I find particularly appealing. Instead, I seem to be drawn to their weirdest and most extreme creations: their fat tired monsters. So naturally, when I saw Susan's new Surly Troll, I was delighted. Sure, it wasn't a Pugsley, but it was nonetheless glorious.


Surly Troll 650B

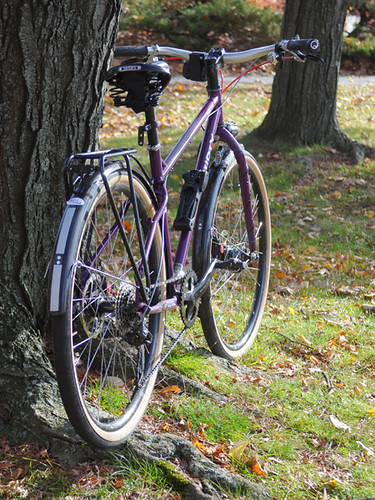
The Troll is a 26" wheel steel mountain bike with clearances for 2.7" tires. Built with eyelets for fenders and racks, it can also be set up as a commuter or utility bike, as well as an off-road touring bike.


Surly Troll 650B

Susan built it up for all of the above, converting it to 650B while she was at it.


Surly Troll 650B
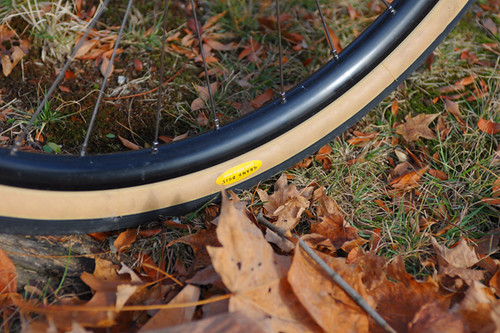
The tires are of course the 42mm Grand Bois Hetres. I realise now that I forgot to ask why Susan chose this wheel size, so normal it has become around these parts.


Surly Troll 650B

The Troll frame can be set up with cantilever/v-brakes or disc brakes - though I think the 650B conversion leaves only the latter option.


Surly Troll 650B

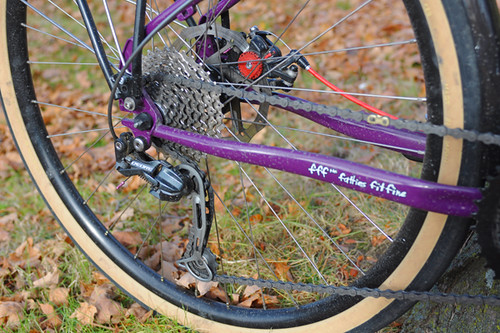
The Troll features interesting dropouts that I have not seen before. They are horizontal and resemble track ends, yet made with a derailleur hanger, making it possible to build the bike up with either hub or derailleur gearing.


Surly Troll 650B

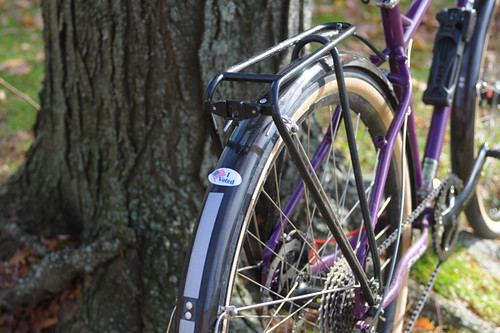
Susan has the bike outfitted with fenders, the Tubus Fly rear rack,


Surly Troll 650B
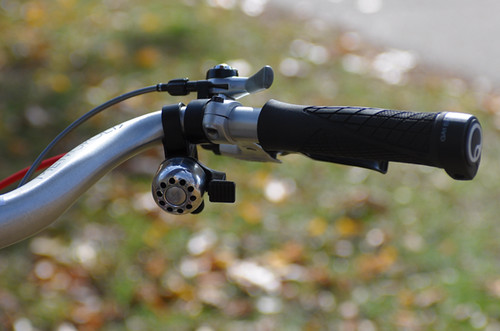
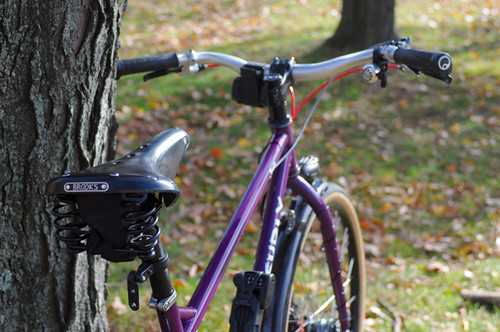
the slightly swept back Metropolis handlebars,


Surly Troll 650B

dynamo lighting,


Surly Troll 650B

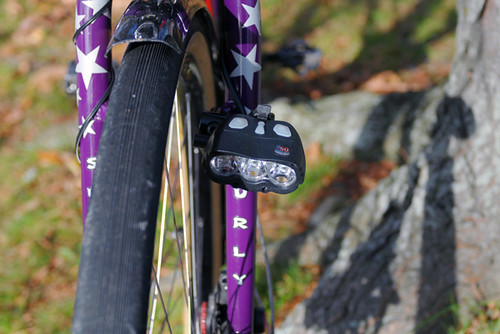
and one of those crazy super-bright headlights that point down to illuminate trails at night, powered by a battery pack.


Surly Troll 650B

There is something about the way this bike is set up that seriously excites me. I look at it, and I want to do "that" kind of riding, whatever that is. An overnight tour along pitch black dirt trails maybe?


Susan encouraged me to try the bike, and I did. The brief test ride proved to be surprisingly informative. The bike rode smoother than I expected.Very nice in fact. The Troll is not a lightweight bike, and it is not fast on the road. But it felt maneuverable in tight spaces and was not as difficult uphill as I expected. The stepover of the frame felt lower in practice than the images suggest, making it easy to hop off the bike without having to swing my leg over the back (I should note that I rode the bike with the saddle about an inch higher than shown here). There was no hint of toe overlap even with the 650B wheels. The disc brakes worked well, though I tried them in a very limited capacity.


Surly Troll 650B

The one drawback of this bike for me was the high bottom bracket (40mm BB drop on the frame), which made it difficult to get the saddle height where I wanted it. I like to be able to put a toe down when stopping without getting off the saddle, but the frame geometry + 650B conversion made that challenging to accomplish with full leg extension. However, I think that with the 26" wheels the bike was originally designed for, it should be okay. I could also try converting the Surly Ogre(a 700C version of the Troll) to 650B. Its 68mm BB drop should be just right for getting the saddle where I like it.


Surly Troll 650B

But of course I am just aimlessly fantasising here. I understand very little about mountain bikes and even less about their monster variations (still trying to figure out what exactly a suspension-corrected fork is). Still, I think that one excellent use for a machine like this could be as a winter bike. The Troll is not quite as extreme as a Pugsley, but neither is it as bulky. If fitted with 26" wheels and fat studded tires it could be just the thing for snowy Boston winters. With the frame priced at $500 MSRP, some strategic budget component choices could make for a fun and functional build.


Surly Troll 650B
Susan purchased her Troll frame fromHarris Cyclery, where she works as a custom fit specialist and lead salesperson. Naturally, she built it up herself, with parts she "had lying around." I hope she enjoys her cool new bike, and I thank her for letting me try it!

Wednesday, August 24, 2011

Back to Clatskanie


On arriving back in Clatskanie, Oregon we found Jan's dog, Paddy, more than happy to go home from the Happy Hound Dog Kennel. I think we were a bit glad to get back, also. It had been a long 3 day trip even if it had been thrilling, exciting, interesting, and exceptionally beautiful. I would recomment a trip to the Olympic National Park to any one. All the places where wonderful to visit with lots of great places to visit. We had gone over a weekend during the summer and it did not seem as crowded as I had expected. And everybody we met, either Park personal or visitors were very friendly.

500 Summits!


It has been in the works since 1975 and last week early on a Saturday morning, mountain guide George Dunn reached the top of Mount Rainier for the 500th time! He climbed with his wife Nancy, son Jeremy along with friends Phil Ershler and Eric Simonson.

On the way up they had to fight through some tough wind and lightning, but were able to push on to the summit, helping George break his previous record of 499 summits! This is by far the most anyone has ever climbed Mount Rainier and he doesn't seem like he will be slowing down anytime soon.


George has been guiding for the past 35 years and has led many climbing trips throughout the world. His knowledge of climbing and of Mount Rainier specifically is a great asset to all of us here. He is currently a co-owner of International Mountain Guides, one of three guide services that operate full time here on Rainier. Our congrats go out to George and his family on this terrific achievement.

For more information about guided trips on Rainier check out these links, and for more information on Georges climb, including photos and videos click here.

Sunday, August 21, 2011

Light at the end of the tunnel?

A good deal of my time so far this summer has been consumed with scanning pictures and preparing pictures for scanning. On June 2nd I reported that another 970 pictures had been scanned since mid-May, plus the 575 pictures of mom's that had been scanned in April.

For the heck of it, I decided to keep track of how much time was spent in scanning. In hindsight I probably should have tracked how much time was spent in preparing the pictures for scanning as well. Once I started on the magnetic albums, it's highly likely that as much time was spent in prep as in actual scanning.

The prep work consisted of removing the pictures from the albums, sorting them into the order in which they were to be scanned, then attaching them to archival paper. After fiddling with trying to put multiple pictures on the scanner bed and getting irritated with them moving when the cover was lowered (due to static), I decided to put the pictures on the pages where I wanted them, add captions as needed, then individually scan the pictures along with their corresponding captions. Too bad I didn't think of that when I was scanning mom's first album. Something to keep in mind for the next one!

Out of the past 48 days, scanning was done on 21 of them, usually 2-3 hours a day but occasionally 4 hours. One day I was on a roll and spent 6 hours scanning! I'm not totally crazy, it wasn't all at one sitting. I did get up a few times to stretch my legs and grab a bite to eat. And yes, I washed my hands after eating and before handling the pictures! Anyway, a total of 70 hours of scanning in 21 days netted another 2278 images. That's an average of 3.3 hours and 108.5 images per day.

That takes care of my personal albums. There are still a few more of Mom's to do. Next up will be the genealogy documents. But, they too need to be sorted prior to scanning. I've mentioned before that with my filing system I put documents of the same type together, regardless of who they are for, whether an ancestor or other relative, giving each document a number. I could find them easily because of the numbering system and the fact that when something was entered in my database the document number was entered for reference, so all I needed to do was look up the person in the database to see where the document was filed. But that system isn't really intuitive and I need to make it easier for whomever will take over my research (assuming there is a family member who wants it or in case it gets donated to a library or society). So that means sorting and putting the documents together for a given person or family. I haven't decided yet whether I'll scan "everything" or just the ancestral documents. "Everything" includes a lot. I think, after I've sorted through stuff I'll do the ancestors first and save the rest for another time. I want to get back to researching! And doing other things. But at the least, I want to get the ancestor documents scanned.

There may not yet be light at the end of the tunnel, but it will be there one day. Soon, I hope.

The picture below was taken in September 1978 while I was stationed in Japan. Above the Clouds. Sunrise from the top of Mt. Fuji. There is a story to tell that goes along with the picture, but it'll have to wait for another time.

Photo Copyright © 1978/.. by Rebeckah R. Wiseman

Saturday, August 20, 2011

First Autumn Snow

Autumn at Mount Rainier, especially in the alpine and subalpine zones, does not last long. In fact, some argue whether it exists at all. Camp Muir had beach-like weather last Thursday; by the next night there was 70 mph gusts slinging fresh snow into climber's tents. Summer conditions to winter conditions in less than 24 hours.

Last weekend about 2" of melted precipitation dropped on the mountain. This caused drifts of snow "knee to mid-thigh" deep on the climbing routes. Snow and high winds can make navigation, especially on the upper mountain, difficult. Be sure to have a solid navigation technique, whether it's using a GPS or map/compass/altimeter, before venturing onto the mountain.

The high winds associated with the storm cycle resulted in poor skiing conditions. Some leeward locations have loosely wind packed freshies, while other windward locations are scoured, grit-covered, hardpack. Though the skiing hasn't become great, the climbing conditions have held out! The lower freezing levels have solidified the sketchier crevasse crossings and the feshly plastered snow has kept loose rock in place.

This upcoming weekend, September 24th and 25th, will be the last weekend that the Climbing Information Center in Paradise is open. Please come on by to chat, chill, and register. We'll be open from 7:00 am to 3:30 pm. After this weekend climbers can self-register in Paradise at the self-registration kiosk on the porch of the Paradise Old Station (the small A-frame right next to the toilet tunnel in the upper parking lot). Directions on how to self-register are posted.

Tuesday, August 16, 2011

How to better your ice climbing?

Photos courtesy of the V. and N.


One of the cool things about having a blog is being able to see where the traffic comes from and what most who read the blog are interested in.


I remember teaching with the now legendary Canadian Guide James Blench, years ago, whenhe ratherpointedly asked me why I didn't "get to it". That while I stood around wide eyed watching him and John Lauchlan whip a bunch of beginning ice climbers through their paces in class. I kept my mouth shut and learned a lot about ice climbingfrom those two guys.


Note worthy side-bar here, giving credit where it is due

"If youwant to goclimbing, anywhere in the world,and really learn the skills more aboutJames in the link below. James is one of the guys who invented free climbing really steep water ice and is still at it. No betteror more experiencedmountain guide working today."


http://www.jamesblench.ca/mountaineering_about.html.


ok,back to thestory ;)

I was afraid to open my mouth. Better be seen as knowing something than speaking up and letting the word (or lack of them) out. So take this FWIW ;)


Rock climbing and ice climbing have a few things in common. I am not so sure that there is as much in common as some profess these days though.


First suggestion is get a pair of comfortable, warm and rigid soled boots.


Second is get a set of the newest, 2 grip, radically curved, leashless tools. Cobra, Viper, Quark, Nomic.


Third is get a set of "typical" 12 point crampons. Sabertooth or G12 style crampon of your choice will do fine.


Yes, I have hear the arguments on mono point crampons and vertical front point crampons. I use them both at times. But I believe the single most important piece of gear for ice climbing is a the combo of rigid soled boot and a equally "rigid" (as in not moving) set of perfectly fit crampons.The front point direction has little to do with the ability to climb well withcrampons on steep ice.


Way more important things to learn about ice climbing than dropping a knee or setting your mono point in your last tool placement. (does any one actually do that?)


This from Will Gadd which I think is spot on:


"Good rock climbers can learn to climb ice a lot faster than good ice climbers can learn to climb rock. I attribute this to the fact that rock climbers already have the fitness, and just require motion training, while most ice climbers are relatively weak. But, while a rock climber can learn to get up about any ice climb in a season or two, just getting up a climb does not mean doing it well. I have seen reasonably competent rock climbers move with glacial speed on what for a good ice climber is 5.5 terrain. I think the real artistry and style of ice climbing is not in just getting up a pitch, but doing so quickly and securely. It's like running--anyone can run a mile, but it's another thing to do it in under five minutes... I would rather see someone climbing well below their max but in total control than someone pushing it on ice, not worth it."


more here:


http://gravsports.blogspot.com//01/new-years-tips-for-ice-ability-gains.html


Most ice climbing is actually a battle to conserve energy. You want to stand and stay on your feet, not hang on your arms. If you use some thought most ice can generally be climbing on your feet. Even very difficult WI6 stuff can be climbed much on your feet.


When you do have to hang off your arms do it quickly, hang on bones not muscleand then get back on your feet asap . Just as you would crack climbing.


Don't kick the ice to death or to build a food hold. Set your crampons on features, weight them and let the crampons..well fit of course..do the work. Better yet look for "steps" on the ice where you can just set your cramponed foot and stand up. Look for the foot holds or "steps" just as you would on a rock climb. Think about and look at what you are climbing.


You should be doing one kick and stand or one placement and stand. Any more and you are wasting energy. Think positive and learn to trust your feet, the first time. PRACTICE.


Tools?...climb leashless. It is easier. Don't over grip. Climb with thin gloves...learn what you need for gloves to stay warm with. Don't over grip. Thin gloves let you to use a lesser grip. Learn to match and climb on one tool at a time. You'll save an enormous amount of energy by doing so. Matchingon your tools and leashless are THE two of the major innovations in ice climbing over the last 3 decades. Follow through on your swing. You are using high clearance, radically curved tools, right? Learn to hook. Hooking saves energy and is much, much faster. You can hook natural features and previous tool or crampon placements. There is no cheating when it comes to ice. My goal is to hook every placement, on every climb.


Never accept a bad placement. Never place a tool at the same height. Skip the Gen X program entirely. Make a real effort to go fast by using fewer tool placements...and keep your heels down.


Feet are easy. Take just oneswing per step...walk your feet as high as possible. Work the tool placements by matching and take advantage of those long reaching placements by walking your feet as high as possible every time. Practice.


Learn to follow in half the time it takes to lead. Yes, follow in half the time or LESS than it takes to lead. Practice andmake it your game.


Don't dick around on climbs...even practice climbs. Think about what you are doing, stay organized and alert. And climb quickly.


Keep you heels down...as in lower than your front points. Not as important as it use to be....because you are less likely to shear your front points in softer ankled boots. But keeping your heels downwill make your calves feel a lot better :)


Helmet head? Use the helmet to deflect dinner places or that bad tool placement you are forced to pull up on once in a while. Turn your head to put your helmet between your face and your tool. Less painful that way when your tool eventually pops. And they will.


Learn to use flat footing or French technique. It is the one technique that will get you through all ice climbing, at any level. Learn to use the entire 12 points of your crampons not just the front two. Using the entire cramponis way more important that having a mono point or vertical front points. Try to remember the great ice faces in the Alps, including the Eiger, were first done with 10 point crampons. Just think what they could have done with the gear we have now. And imagine what you can becomecapable of with it!


Read the ice. Know what solid, junk, new, soft or oldice is. Know where you have to swing and where it is more likely you can just hook good placements.Recognise the colors and textures and what is good or bad for YOUR INTENDED PURPOSE. Do you want to hook it quickly or get a bomber screw? They aren't the same ice. Get off the vertical any time you get a chance. Even on vertical ice there are small corners and grooves. Work them both and stem where it is possible. Even a small stem can turn the suffer-fest90 degree pillarinto a 85 degree romp.


Remember when ice climbing really sucks...and it will at some point....it is just ice climbing, and you chose to be there. Even the hard parts won't last for ever and with even a small amount of thought and precaution you are unlikely to die :) Relax your grip...your hands will stay warmer.


These aren't all the bit and pieces that will make you a better ice climber. But it is a good start I think. "Reading the ice" is equally import in making ice climbing easier. But that takes time on the ice as well as some thought. More on that nexttime.


James would likely still say, "when are you going to get with it". But thisis all I got for the moment.


Remember it really is easy and the basics will generally get you by if you think about it. Stay just warm enough, climb hard and push your own limits even if that means you do it on a top rope!

Monday, August 15, 2011

Blob's Park Americana by Ben Pagac


Coming of age in the Maryland 'burbs in the 1970s inevitably lead many of us to a large, hill-side German polka joint within a stone's throw of the BW Parkway. It's curb appeal wasn't apparent at first. The name "Blob's" perhaps only drew those with a smirky sense of humor. (In fact, some might have been taken there by their parents. Ugh!)


But once discovered, it was natural to develop a soft spot for the place. One reason high on the list- cheap pitchers of beer. Even better, a weird policy of charging a $1 (returnable) deposit on the pitcher. (Did they really fit in a purse?) This turned out to be a source of much-needed income for those who closed the joint, capitalizing on the forgetful. If you were fast enough, your night could be free!


But it was more than just cheap beer. Despite bathing in the excitement of the creative Punk and New Wave DC scene bubbling during that time, there was something comforting about watching polyester-suited gentlemen and perfectly coiffed ladies move to the rhythmically predictable. And how could you help not join in the Chicken Dance, still secure in the knowledge that your ripped jeans and Ramones T-shirt made it very clear that you were just visiting-not one of “them.” It seemed so afar from what our ears and bodies were tuning into, that it sounded and felt...well, good!


Remarkably Blob’s still exists. And looks pretty much the same. Sadly no more pitcher deposits. But the mural of Prague (huh?) is still behind the bandstand. And it is now showcasing diverse, danceable music. Their once-a-month Honky-tonk night has been building steam. The familiar neon “Blob’s” sign fell down 10 years ago, but rest assured, Blob’s is still there- for now.

Sunday, August 14, 2011

Allen County Public Library Grand Opening

This afternoon I attended the ceremonies for the grand opening of the Allen County Public Library in Fort Wayne. It's impressive, to say the least. I spoke very briefly with Curt Witcher, the director of the Genealogy Center, and of course he was quite excited. He said there were a few minor things that still needed to be completed but they were about 99% ready for the opening. Below are some pictures I took this afternoon.

Some lucky folks got a sneak peak at the library last Sunday. You can read about that in an
article in the Fort Wayne News-Sentinel; they also have some pictures.


Opening Ceremony The opening ceremony. A few people were on hand.
ScannersThese scanners allow you to create a digital image of the microfilm, two of them can also scan microfiche. The image can be edited on site. If you load the film wrong and the image is backwards you don't have to reload, the scanner can be set to reverse the image. It can also rotate the image and switch it from a positive to a negative or vice versa. Way cool. Even more cool, you can print the images or write the images to a CD or save them to your thumbdrive (or any USB drive). The email feature is not yet working. I could see using that if you only had a few images. I forgot to ask if they sell the CDs. At this time there is no cost for scanning or printing but, according to the staff member that was giving the demonstration, that may change in the future.


Patron AreaThis was taken shortly after the opening ceremony. It is the largest of the patron work areas. It is in the same room with all of the family history books, a small portion of which can be seen on the far wall. The chairs are very comfortable. Two copy machines are available in this room.


ShelvesThis is a huge space. It is where all of the City Directories and oversized books are located. The shelving units move with the push of a button. If someone is in the row the unit won't move. Of course everyone had to see if they worked properly. There are three aisles of shelving units. Each unit is quite wide, probably 20 feet or so.


ComputersOne of the computer areas. This was about 15 minutes after the opening.


East EntranceThe east entrance from the south side. A city street used to be where the stairs and the ramp are now. The entire area in front of the library has been turned into a plaza. The entrance and the side to the left of it are new. That's where the cafe and bookstore are located. The inside of the building was completely gutted and remodeled. If you've been there before you won't recognize it as the same building, nothing is where it was.


East EntranceThe east entrance from the north side.

Aaargh. I got a little frustrated adding these pictures. They kept disappearing on me! Aside from that, it was a GREAT day!!

Saturday, August 13, 2011

Feedstore Animals

we went to a feedstore one evening to get some feed tubs for my horses, (heck of a note when you go 250 miles to get feed tubs for horses), Landmark Feedstore in Mesquite, NM. They have a few animals for people to see such as Clyde the Camel, a steer, a bison, some miniture donkeys, a horse, some pigs, and sheep. It was almost dark but the photos didn't come out that bad.






Tiny treasures


Virginia pennywort, Obolaria virginica


A plant that's very easy to overlook in the leaf litter. It would be nice in rock gardens, I think. Some of them get a bit larger than this, but not by much.*

Do you see any violets?

I took this picture with the camera pointed at my feet.** There are almost a dozen clumps of Viola walteri in the frame. (A.k.a. Prostrate blue violet or Walter's violet.)

Here's a closer look, with my foot for scale:***

They're very petite.

Most of them are purple, but there are a few white ones:

Every flower in a clump is the same color.


They have a medium-length hook or spur behind the flower. At our place they grow in dry limestone areas. (For the longest time, I just assumed they were regular violets that were stunted because of poor soil conditions!)

Common but still enchanting:

Bluets! This is one of the first wildflowers that I learned the name of. It's also how I learned that many birdwatchers are also very knowledgeable about plants: when the birds aren't showing themselves, you can always look around on the ground. ("Hey, what do you call this little purple flower, anyway?")

-----

*My glove size is small, so this really is a tiny plant.
**I'm 5'4", which is exactly average for American women by the way, not short, and I'm not standing on a rock or anything.
***My feet are sort of small too, size 6.
(Yes, since I've gained weight I like pointing out the things about me that are still small!)

-----

In researching the Walter's violet I came across a nice Alabama wildflower web page, Alabamaplants.com. Here is a link to that site's excellent photos of Viola walteri.

-----

A sad update:
While preparing to email Dan Tenaglia about his excellent site mentioned above, I learned that he passed away in an accident just last month.

Wednesday, August 10, 2011

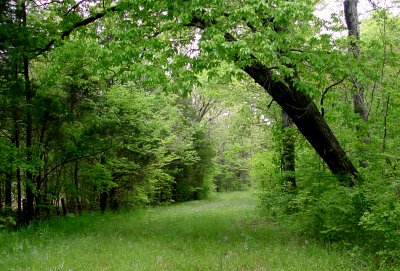
Where I walk


One of the farm roads.

The perfect combination of rain, early warm weather, and no late frosts has made for a wonderful wildflowery spring.

I've never seen crossvine in such profusion.


An explosion of ginger.


An embarrassment of foamflower.


Unfortunately the poison ivy is doing very well also.


Maybe it's time to mow.


Summer is hard on the heels of spring. Wood Thrushes are playing their flutes. We've seen lightning bugs!