Saturday, August 28, 2010

Wordless Wednesday :: Yum

Fresh. Purchased at the field. Scrumptious.

With a penny, just so you can compare the size!

Thursday, August 26, 2010

Montaña De Oro

Wednesday, May 29th - - I have been back in Indiana for two weeks and am staying with some friends. I've found an apartment but it won't be available until the end of July and I'm still waiting for the final approval. However, it will be worth waiting for - it has a garage! And I'm looking forward to "settling down" again. Thankfully my friends are very good ones and are willing to put me up and put up with me for a while.


Tuesday, April 30th - - In early afternoon I left Yosemite National Park and continued on to the coast arriving at Montaña De Oro State Park, a few miles southwest of Morro Bay. I fell in love with that area when I was stationed at Point Mugu (near Oxnard) in the mid-1970s.


The website for the park states that Montaña De Oro is one of the largest state parks in California and features over 8,000 acres of rugged cliffs, secluded sandy beaches, coastal plains, streams, canyons, and hills. I've stayed here before and enjoyed it very much. As you can see in the photos, it was rather cloudy and overcast - it was rather chilly too!


One of many flowers in the Ice Plant that was growing alongside the road.


A close-up view of the inside of the flower.


Looking toward the south.


Details that were hidden in the dark original photograph show up a little better after it was converted to a pencil sketch.


Looking toward the north.


Wednesday, August 25, 2010

Remembering Joe Puryear

Last Wednesday, October 27th we received tragic news that friend and former climbing ranger Joe Puryear lost his life while climbing Labuche Kang, a remote peak in Tibet. His partner on the climb was David Gottlieb, a current climbing ranger.

This loss has deeply affected everyone in our community. Joe was an incredible person and he will be greatly missed. Our thoughts are with Joe's family and with David, as he continues to deal with this situation in Tibet.


To read more about Joe's incredible life and climbing adventures please visit his
website.


Tuesday, August 24, 2010

James Joslin :: 1840 Whitley County Federal Census

In this previous post we learned that James Joslin "of Delaware County, Ohio" purchased 80 acres of land in Whitley County, Indiana from the U.S. Government in September 1837 and that it was patented in August 1838.

We don't have a firm date as to when James and his family arrived in Whitley County but on page 227 of "Counties of Whitley and Noble, Indiana" (edited by Goodspeed & Blanchard, 1882) it shows that James Joslin was among the 12 residents of Troy Township to cast a vote in the first Presidential election held on July 4, 1839. And, in "Recollections of Early Troy by Mrs. Fannie Marrs" published on page 253 in the 1907 "History of Whitley County, Indiana" (edited by Kaler & Maring) she states "My father, Price Goodrich, landed here in June, 1838. James Joslin, John Black and Harlow Barber, with their families, came in 1839."

There are a myriad of spelling variations for the "Joslin" surname. Just change the o to a, the s to c or sc or ss or sh, the e to y or omit it entirely… so I generally use the wildcards "Jos*" or "Jas*" for searches when wildcards are allowed. Some of the spelling variations that have been found are: Jaaslin, Jaclen, Jaclin, Jaclyn, Jaslin , Jocelin Jocelyn, Joscelin, Joscelyn, Joselin, Joshlin, Joshlyn, Joslyn, Josselyn, Josslin, and Josslyn. On one occasion it was spelt Gloslin, but the vast majority of the time my particular family has been found as Joslin.

A search of the ancestry.com online census index for 1840 using the wildcard search of "Jos*" shows two households with the surname of Joslin and one Joselin living in Indiana. There was also one household with the spelling of Jocelin and two with Jocelyn. The only household in Whitley County, Indiana in 1840 was that of James Joslin. (I have viewed every page of the 1840 census for Whitley County to verify that there are no other Joslin families included.)

James Joslin is the fourth name listed on page 455. Price Goodrich, probably a brother of James' wife Abigail, is the sixth name. A portion of the record, cropped from the ancestry.com image is shown below, click on the image for a larger version.


In the Whitley County Marriage books are records for 10 individuals with the "Joslin" surname. Five of them are for known children of Lysander Price Joslin. The remaining five are:
Fanny P. Joslin to Joseph Shoemaker on February 5, 1843 (1st Book pg 68)
Lysander Price Joslin to Lydia Robinson on August 23, 1843 (1st Book pg 76)
Emily Eliza Joslin to John Long on October 12, 1854 (Book 1 pg 187)
Edwin M. Joslin to Sarah Fellows on November 9, 1854 (Book 1 pg 182)
Joseph A. Joslin to Prudentia E Noble on June 2, 1861 (Book 2A pg 55)

Given the fact that James Joslin is the only "Joslin" household in Whitley County in 1840, it has been presumed that the individuals listed in the above marriage records are the children of James and Abigail Joslin. And, yes, I am quite aware that all of the "children" listed in a household are not necessarily the children of the head of household. That fact notwithstanding, and with additional research that has been done on each of them (sources available upon request), the household of James Joslin in the 1840 Whitley County census appears to be:

  • 1 male 5-10 [1830-1835...Joseph A. was born September 11, 1832]
  • 1 male 10-15 [1825-1830...Edwin Mattoon was born December 17, 1829]
  • 1 male 15-20 [1820-1825...Lysander Price was born May 1, 1825]
  • 1 male 40-50 [1790-1800...James was born about 1796]
  • 1 female under 5 [1835-1840...Emily was born December 12, 1837]
  • 1 female 10-15 [1825-1830...Fanny Philanda was born October 1826]
  • 1 female 30-40 [1800-1810...Abigail was born about 1805]

Saturday, August 21, 2010

Henry M. Jackson Visitor Center II

On Friday, October 10th, the second reincarnation of the Henry M. Jackson Visitor Center was opened to the public and dedicated to the highly regarded and revered Washington State Senator Henry "Scoop" Jackson. Funding for the original saucer-shaped visitor center (check out the image to the right - a distinct likeness of the old JVC and a flying saucer taking off into space) was guaranteed much to his hard-work and dedication, so it was only fitting that the new visitor center also carry his name. Peter Jackson (the son of Henry Jackson, not the director) spoke at the ceremony, highlighting his father's love of wilderness, his desire to protect our country's most precious spaces, and to create enjoyable ways for people to learn from and enjoy these amazing places throughout our country and this state. The ceremony drew big-wigs from Washington (D.C. that is), including the Secretary of Interior Dirk Kempthorne, Representative Norm Dicks of Washington's Sixth Congressional District, and the Chairman of the House Subcommittee on National Parks. Other distinguished guests included local Nisqually tribal elder Zelma McCloud, National Park Service Pacific West Regional Director Jon Jarvis, the aforementioned Peter Jackson of the Henry M. Jackson Foundation, Mount Rainier National Park Superintendent Dave Uberuaga, an elder representative from the Consolidated tribes and bands of the Yakama Nation; yours truly of course and another famed NPS persona, Mike (Gator) Gauthier, dressed to the nine's in his class "A" uniform, and several hundred other attendees at the ceremony.

The new 'green', energy efficient JVC II is architecturally designed to match its surroundings and the historical park style, referred to as 'Park Service Rustic'. The feeling of the building when you first enter is dictated mostly by the space, due to the height of the ceiling and massive windows that line the entirety of the wall, naturally lighting the surroundings. However, it could also have something to do with the weird climber want-to-be mannequin placed high atop the climbing display. A feeling of comfort is there too. Above you are post and beam rafters, held together with cast iron fixtures and signs made from a menagerie of dark metal and wood. Overall, I was impressed and I think the sentiment was shared by most.
If you missed the grand opening, fret not, as you will have ample opportunity to view the building on weekends and most holidays, including the winter/holiday break from December 20th through January 4th. And as has been the tradition up at Paradise for many years, Ranger-led snowshoe walks will begin at the new JVC (snow permitting) on December 20th. The two public walks (12:30, 2:30) are approximately 1.5 miles in duration and last less than two hours and are moderate to strenuous. The walks are an amazing opportunity to experience the Park and Mountain in the wintertime. The adjacent photo was taken this past winter as I was returning from one of my group snowshoe walks - a beautiful view of the old JVC at sunset.
The opening of the JVC II means one more VERY important thing....re-opening our beloved Climbing Information Center (CIC) up at Paradise next summer. The CIC will function as it did before; climbing rangers staffing the desk will issue climbing permits and sell climbing passes, provide up-to-date route and snow conditions, weather forecasts, advice and as can only be expected from climbers (and NO ONE else) when they are awake and moving at 6:00 a.m. on a Saturday - perhaps some witty banter as well. See you all on the Mountain!

Friday, August 20, 2010

I'd like to see these two get married!

I know, hard to visualisebut I would really like to see these two boots have mutant off spring in a size 45.


How about a real climbing boot you can actually ski in that istech binding compatible @ about 900g per boot?

"The truth is that LaSportiva's original heritage business was leather ski boots and when it all went to plastic in the 70's La Sportiva abandoned the category because they couldn't afford the plastic injection mold investment costs and that is when they really started focusing on climbing and mountaineering"Colin Lantz, La SportivaThe brain trust is there, who better to combine the two technologies?

Something similar in volumeto the TLT and a price aroundthe TLT Performance's retail? Doublethe retail price of the Spantik and still save money?!


Photo courtesy of Krister Jonsson

http://www.alpinemadness.se/Mountainguide/Home.html


The technology is obviously there now. Not like we are looking back to the future or anything. Galiber's "Rigid Rand" fromthe '70s.


Scott Super Lights from the '70s as well.


With the current technology this would be easy. Would you want a pair?


Fitting and the detailing on climbing packs?


If you look around the Internet for so called "climbingpacks" the prices might well run between $30 and darn near $1000. Yep..a $1000! Of those listed damn fewactually willfulfill the hype as real "climbing packs" in my opinion.


This will be the first of a several part discussion on climbing packs.


If you were paying $200 for a pair of shoes would you accept a pair of size 11s for your size 9 feet? Of course not. "Dumb Ass" question isn't it? How about a $25 pair of flip flops? Would you take a size 6 for your size 11s? Likely same answer..."dumb ass" question. Why bother to ask or answer?


There are a few things in the out door industry that really bug me. They bug me because over the years they have gotten worse instead of better. Climbing is generally a sport that people grow out of. The rare exceptions are Fred Becky, a fewof the greatAlpinists that are still alive and likely the majority of the the crew over atSupertopo :)


From my perspective boot technology hasn't made any huge advances in 30 years. Climbing packs...nothing there either. Crampons....sheesh don't get me started on crampons!


But today the topic ispacks. More specifically climbing packs, their build quality and how to fit one so it does what is should for you in the mountains.


Any climbing pack is going to be a soft frame. Generally a really soft frame as in only a foam pad stuffed in some manner into the inside the pack. The frame doesn't mean a lot (but it is important) but what does mean a lot is the length of the back panel. That back panel must fit your physical measurements or the pack will be pretty useless.


In turn the correctly fit pack and your own anatomy will define how big the pack is. When you are talking climbing packs don't expect a 18L pack to fit you well if you are 6'3" or a 45L pack to be any better if you are 5'2".


Most of us will be best served with packs in the 30 (1800)to 40 (2500) Liter range for actual climbing while still having something useful for getting back and forth from the climbs. Why those sizes? Because most backs will fit between those pack volume sizes.


John Bouchard:

"To get an idea of how important each pound is when you’re climbing hard climbs
where you can’t afford to haul the pack, try doing pullups with weights around
your waist. Start with 5 lbs. and keep increasing in 5 lb. increments. For me,
each 5 lbs. decreases my performance by 20%!"


http://www.wildthingsgear.com/wild-things/stories/light-is-right.html


If you want to actually climb difficult technical ground, limit the weight in your pack and clothing to 20% of you actual body weight. For me that is 38# total or less. 38# for boots, clothing, water, foodand thetechnical gear! If you climb with me and you weigh 50# less we don't carry equal loads. If your total body weight is 125 pounds your entire kit from sleeping bag to boots will be smaller and lighter.That will make up for some of what you carry but not all. Your total load's weight should be25 pounds!It is much much easier in the alpine to have a partner of similar size physically for a number of good reasons. This is just one of them. If you want to climb hard, climb smart first.


Sure you can climb with more weight. But you will want to know how to haul a pack if you do. Or get your partner to climb in a pack and just take one pack. Here are a couple of tips for fitting a pack. First fill the pack up. Not overly stuffed just "full". I tend to use ropes for this. Ropes run 6 to 8 pounds for a 60m rope. With these size packs 3 or 4 ropes max will fill one up and give a soft but firm pack with an appropriate amount of weight to try them on for sizing.


With the straps loose the thing should sit on the top of your butt. You should have full range of motion with your head and neck with a helmet on. Can you look up and not touch the pack? You need to be able to.


This is a good fit length wise on the back. The pack is sitting on the top of the butt.


Hip belt is too high here and way too wide forthe weight it will carry

It only takes an inch or too either wayon th back panel length to make a pack almosttotally useless.


Bounce the pack up a bit and suck in the hip belt. It is a climbing pack so ditch the damn padded hip/waist belts that are 3 inches or wider. They are worthless with any weight you can actually climb in. Quick wayt to tell if the pack designer has a clue about climbing in fact. A simple 1 1/2" or 2" webbing waist beltis enough for anything you'll want to carry up to 3 days or so. Less will do as well if the pack actually fits. You don't want to constrict your hips or abs when you tighten the waist belt. Use soem common sense and let your body tell you if the pack fits.


I get called a "girl" on occasion. But from what I have seen a woman's climbing pack should be fitted no different than a man's. The ladies are more difficult to fit in the shoulders but the fit should be the same imo. Start with the correct pack length and then go from there. I am not a woman so I can't say that with any certainty. And one of my partners has yet to be convinced she can wear a hip belt of that size and in that position.Her worry is keeping the freedom of her hip joints. She has a new pack coming that is being built on the ideas I have posted here. As are all of my custom made packs. The experiencefrom that new pack should tell us a lot. So there will be a woman's insight following up on packs and pack fitting in the near future.Ladies, ifyou disagree with what I am writing hereplease tell me and why?


Once you have tighenedthe waist belt let it settle down where it is the most comfortable for you. That is generally on your hip bones...and a inch or twobelow your Iliac crest and setting on the top of your ass for support. Yes, both boys and girls have enough ass to support a climbing pack's weight.


http://en.wikipedia.org/wiki/Iliac_crest


My finger indicates the top of my Iliac crest. My hip belt is most comfortable and able to carry a majorityof the pack's weight if it is located several inches belowthe Iliac crest.


This should be a comfortable position on your hips as it is where most of the weight will be, or should be anyway. Carried by your hips not your shoulders...even with just 20% or LESS of your body weight involved. Then pull in the shoulder straps. Take about 40% (or less) of the pack's weight on to your shoulders now. But not too tight. Don't lift the pack off your hips. Do you still have full head clearance with a helmet? If the answer is no...ditch the pack...it sucks for climbing.


This is OK but getting a little high on the back..so likely too long of back panel and we shouldn't be seeing air between pack and back.


This is a better fit, note the curve on the shoulder straps going up and then over the shoulders.

My body position here sucks for the picture as I am bent over and my head down so the pack looks short. It isn't.


Make sure the pack straps come out of the pack narrow enough that they will stay on your shoulders.

I am 6'1" and 185. And I can still find shoulder straps that are way to wide for my shoulders and how they have developed. I don't have tiny shoulders but I have a hard time getting a tank top to stay on them unless it is tight. My shoulders aren't flat on top. If thepack straps are too wide coming out of the pack they are simply unusable for me. I need 2" between them, but prefer no more. You might need more or less.


If you are still good,with a 60/40 split on the weight now, check your sternum strap. It is the last adjustment. Too high or low and too tight will cut your breathing. Pay attention here. Get it adjusted right. Big chested men and women will have a problem with this one if the shoulder straps and sternum strap aren't able to be moved and adjusted right. The sternum strap will really aid in how secure the pack feels on your back and your balance because of it. Get it right and a decent size pack is easy too climb and ski in. You'll seldom notice it if you limit yourself to that 20% over all weight number.


Too short of shoulder straps and too high of sternum strap


Correctly fit shoulder straps and a better position on me for the sternum strap


Depending on how a woman is built the sternum strap might have to be located much higher than on a man.


Make sure your shoulder straps come out of the back, go up a tiny bit and then over the shoulder and down. Too much up on the shoulder strap and the pack is too small in the back length. No curve there or worse yet the shoulder straps going down over your shoulder and the pack is too big in the back length.


Classic case of too small of back panel for my physical size and too short of pack straps.

There is no way to make this pack fit me. I'd be much better off with a longer pack instead of longer shoulder straps. But note that the waist belt and bottom of the pack is in the right position.


I am actually climbing here in the same pack. The problem would seem obvious although the pack is reasonably comfortable because I am not carrying a lot of weight. (although I carried 3 days worth of food/gear on this trip)But really no matter how cool I think this pack is, for me this one sucks because of the limited back panel and shoulder strap sizing. A 17.5" back panel is never going to fit my 21" back.


Even with the lid off thisis a much bigger pack than the green 27L pictured but more importantly a much better fitting pack for my body size. It is also much easier to climb technical ground with or ski in. A better picture of my personal pack fit. It may not be perfect but it is very close. The waist belt is not buckled which allows me to play with the pack's fit and shoulder straps in this picture.


Don't try to put you size 11 feetin a size 6 shoe!


More importantly don't let some lame ass salesperson or pack maker do it for you!

This isn't rocket science folks. But neither is it easy to get a really good fit. Packs have been used for millennium, the more simple they are generally the easier they are to carry. Find the packs that fit you the best and then make side by side comparisons to others of similar back panel size.


Only your boots should take more fitting than you climbing pack. Both will make the difference between relative comfort and an unpleasant trip.


In the day of technology and a "app" or every application you are FUBARed if you think of climbing packs in that contact. The weight in any pack is best carried as close to your back as possible for comfort and balance. Modern ice tools and crampons can easily go inside these packs. I do it all the time with Nomics and Dartwins and have yet to damage a pack in the last 3 or 4 years. I seldom use a lid on a pack but like the option of adding one at will.


Super light and super tough fabrics are cool. Most of my packs are made from one form or another. But it saves mere ounces on even the lightest packs. It is the suspension and foam pad that are the biggest percentages of weight. Start adding whistles and bells and the actual pack material will have an even smaller effect on the over all weight of the pack.


Soft frame climbing packs have a big margin of error for sizing. If you are within the norm you should easily be able to find a decent pack in this size range that will fit you. If not make sure your pack maker or the production pack you want actually fits. I am 6'1" but I have a really long back for my body size. I am 21" from base of neck to top of my hips. It is not the norm. I also have a 44" chest when I am in decent shape. That makes a long pack backwith longer shoulder straps fit me better. Having a good range of travel for my sternum strap makes it more usable as well.


Common sizing info..this from CCW:


"Back sizes are
determined by measuring from the tip of the hip bone to the prominent cervical
bone near the base of the neck. This is the standard measurement used throughout
the industry. Figures given next to each model on the product page correspond to
this approximate measurement, not the actual dimensions of the pack. In general,
though, our size medium/regular fits people 5'7" to 5' 10" while a large fits
those over 5' 10". This varies, as torso lengths vary from person to person. Our
packs have non-adjustable harnesses. "


this from Wild Things:


Finding Your Pack Size (Torso Length)


Finding the right pack size for you relies on your torso length, not your
height. To find your torso length have a friend measure your spine, using the
steps below:


  • Find the most prominent vertebrae (C-7) at the back of your neck (tilting
    your head forward helps). It’s the large bump at about the same level as the top
    of your shoulders.

  • Find the top of your hipbone (the iliac crest). Follow this point around in
    a straight line to your spine.

  • Stand up straight and lay a flexible measuring tape directly against your
    spine. Measure the distance between points 1 & 2.


Pack Sizing Information


SML
Torso Length1819 1/221


Measurements refer to body size, not pack
dimensions, and are in inches.


The single most important thing you need to know on your climbing pack is DOES IT FIT?


PART TWO and Three of Climbing Packs


For part two and three of this series I'll discuss quality of manufacture, the required accessories,fabric choices and over all pack weight.


Pictured here are the same packs cut from different fabrics.


Saturday, August 14, 2010

Reunited

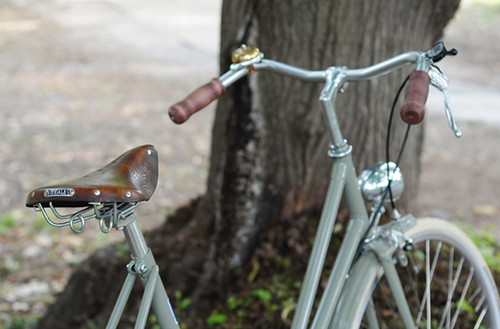
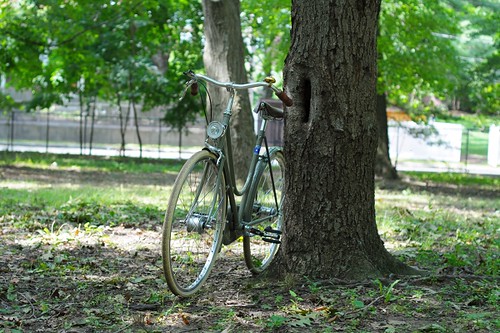
Bella Ciao with Vintage Ideale Saddle and Wooden GripsAfter what seems like ages, beloved Patrizia has finally returned to me. This is my personal Bella Ciao bicycle that has undergone many customisations and served as the "Superba" prototype guineapig. Having spent months in various states of disassembly, she then endured a long stay at the rack-maker's workshop - all without a word of complaint. And now she is back, her slender curves enticing me with promises of a romantic Indian summer.
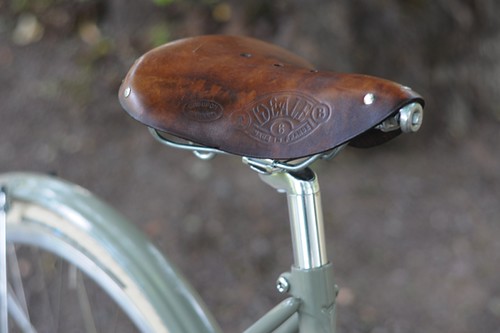
Ideale Model 6 SaddleI am also reunited with the wonderful Ideale saddle I'd acquired in a trade some time ago. I had installed it on a vintage mixte I owned at the time, but after that bicycle was sold the saddle lived in my closet for over a year, waiting for the right moment to re-emerge. It looks and feels quite at home here.

Ideale Model 6 SaddleIdeale was a French saddle manufacturer and the Model 6 is a wide, short-nosed women's saddle that was made some time in the '70s. Although some have drawn parallels between the vintage Ideale and contemporary Berthoud saddles, in my opinion they are nothing alike and Berthoud is not an Ideale remake.
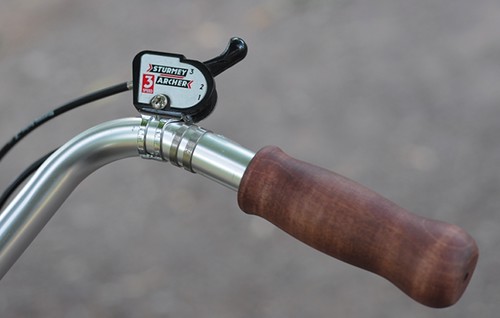


Finding a vintage Ideale in good condition is not all that common. After years of use, these saddles tend to suffer from the type of distortion where a painful center ridge forms that is resistant even to the "blocking" (wet reshaping) remedy. It is an amazing stroke of luck that mine does not suffer from this defect. Truthfully, I am somewhat torn between wanting to use it because it is comfortable and wanting to preserve it because it is rare.

SA 3-Speed Trigger ShifterFinally, I am reunited with the wooden grips I began to experiment with a few months back. I've decided to keep them on this bike, and they have been surprisingly comfortable. I thought that I might get blisters on my hands, but it hasn't happened. I am also happy to report that they haven't cracked or distorted despite plenty of humidity and temperature changes over the summer. I am not going to finish them with any kind of sealant, because I'd like to see what happens to them in the winter. Vintage collectors who are experienced with wooden grips have told me that if the grips are made "in the right way" they should not need any sealant and will be fine as they are. We'll see. While I'd be reluctant to recommend these for mainstream use, personally I love them.
Customised Bella Ciao Corvo CittaRiding this particular bicycle always makes me realise how weird my tastes are. Responses to it have included "Ew, that colour!", "How can you ride with those things on the handlebars?" and "Is that a woman's army bike??" - all of which I've found oddly gratifying. Looking with fondness at her wooden grips, pukey powdercoat, trigger shifter and mottled 40 year old saddle makes me want to put my arm around Patrizia: "Looks like it's just you and me, babe."

Friday, August 6, 2010

Looking Down on Rainbow Falls


Looking Down on Rainbow Falls, originally uploaded by ParsecTraveller.

A wonderful, 101-foot waterfall in Devil's Postpile National Monument. The hike was interesting and the waterfall rewarding!

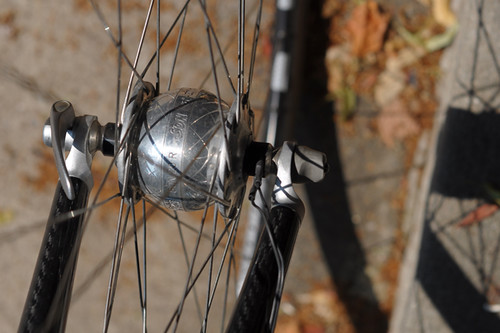
Dynamo Lighting Kit for Roadbikes

Temp Dynamo Solution: Cyo Headlight Mounts on Brake

While I am generally a huge fan of dynamo lighting, I do not have it installed on what is currently my only roadbike. My plans for the bike did not involve significant amounts of night-time cycling; it was not meant to be a touring or randonneuring bike. For occasional riding in the dark I do have an excellent rechargeable battery headlight that lasts for hours and attaches easily to the handlebars. And I have an equally good tail light that attaches to the back of my saddle wedge tool bag. To install a dynamo hub wheel and lights on this bike would have added unnecessary weight and expense to the build.


I felt pretty good about my bike's lighting setup until I found myself wanting to join an overnight ride. Initially I thought that my super duper rechargeable battery headlight would last through the night. But when I did the math it became clear that it would not; I would need to add a second headlight and to bring several sets of spare batteries. Even at the height of summer an overnight ride in New England means 8+ hours of riding in the dark - and not the kind of milky suburban dark where you can leave the light on a low setting to conserve battery life; proper boonies dark that requires a powerful headbeam. I talked to the others doing the ride, and they all had dynamo lights. Now I felt foolish for not having a bike with appropriate lighting. But at the same time, how often would I do rides like this?


Temp Dynamo Solution: Loaner SON Hub Wheel

I was discussing this with local cyclist Pamela Blalock and she offered to lend me her mobile dynamo setup: a spare front wheel with a dynamo hub, and lights that are easy to attach and remove. With this kit, she can turn any 700C wheeled roadbike into an overnight bike. Extremely grateful to Pamela for the offer, frankly I was also skeptical that it would work out. To me, dynamo lighting was something that gets permanently installed - not attached and removed on a case by case basis! Furthermore, my bike has no fenders, no racks, no braze-ons. Could the lights be attached securely? I was worried that the installation process would be tricky, and that in the end something would end up falling off, disconnecting, or malfunctioning.


To my amazement, the installation process took mere minutes. The front wheel switch was seamless and soon my bike was sporting a dynamo hub. Then the headlight was attached to the brake bolt, as shown in the first picture. A thin cable runs straight down from the headlight to the hub, easily secured to the fork with a piece of tape.


Temp Dynamo Solution: Pixeo Tail Light on Stay via P-Clamp

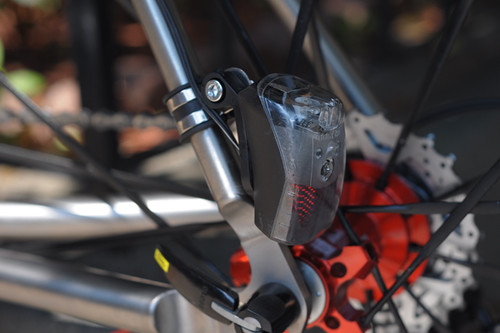
For the tail light, a P-clamp was installed on the left chainstay. The wiring got routed along the chainstay and the top tube, secured with zip ties to the brake cable. The result was not beautiful, but neither was it flimsy. It was secure and problem-free. The positioning of the headlight and tail light beams were spot on.


Later I learned that other local cyclists employ a similar system for when they ride in the dark - a dynamo hub wheel and lights that get moved from bike to bike as needed. I would not have thought this to be a good idea until I tried it myself and experienced how easy and hassle-free it was. On a dedicated randonneuring or touring bike, it makes sense to have dynamo lighting permanently installed in a more elegant manner. But for those who want the option of using their pared-down roadbike for occasional night time riding, a kit like this can be a good solution. Pamela's setup includes a 32 spoke Velocity Aerohead wheel built around a Schmidt SON hub, a Lumotec Cyo IQ headlight and a Spanniga Pixeo tail light - though many alternatives exist.


At least here in New England, there seems to be an increasing amount of cross-over between road racing, randonneuring, endurance events, and casual long distance rides. And this cross-over is influencing how roadbikes are defined and equipped.I am still unsure what kind of cycling I will ultimately gravitate toward. But if more night time rides are in my future, a versatile dynamo setup like this is certainly worth considering.

Monday, August 2, 2010

Meet the Reeves

Let's start with Mrs. Reeve shall we?

Here's abeautiful example of the human spirit.

First climbing experience: The long, rambling "Caves Route", Grade 4.

For our international readers -that does not rate on your scale. It's too easy.

Totally freaked, and swore off climbing forever.

But something internally had changed.

Sheunlocked her inner steep climber.


Can't get much steeper than that."Hung Like a Fruit Bat" 25 Coolum Cave


Let Ruth Reeve be a warning to 'fraidy women everywhere. Find your bravery, and you too could spend a year upside down workinga route like this.


What?Too much with the new "Logo" draws?You think?


The camera has trouble focusing on the climber when they are in frame.


You think I've forgotten Mr Reeve?

Hey, I'm not saying he is old, but here's a shot from the 30's of Dave on Hung Like a Fruit Bat.


Hey Dave, you got the time?